Click to Visit These Popular Posts

CONFESSIONS OF A PLATE ADDICT No-Sew Sweater WreathCONFESSIONS OF A PLATE ADDICT Wintery Centerpiece with Easy Sweater Snowballs2CONFESSIONS OF A PLATE ADDICT Mason Jar Sweater CandlesCONFESSIONS OF A PLATE ADDICT How to Make a Sweater Pillow
Showing posts with label Sheet Music. Show all posts

25 December, 2016

Reader Favorites...The Best of 2016

CONFESSIONS OF A PLATE ADDICT Best of 2016Christmas is winding down and New Year's Day will soon be here! It's time for another year and a new beginning. However, I always like to take a look back over the previous year to see which posts were the most popular...just to give me an idea of what you, my readers, like to see here at Confessions of a Plate Addict! Sooo...here are my top ten posts...
The Best of 2016! 

27 November, 2016

Eight Ways to Decorate with Plaid at Christmas

CONFESSIONS OF A PLATE ADDICT Eight Ways to Decorate with Plaid at ChristmasWhen it comes to decorating for the holidays, is there anything that says Christmas more than plaid? Maybe it’s all the red and green but it just makes me feel all warm, cozy and Christmas-y! I have it sprinkled around the house during the holidays in just about every possible form! Sooo… I thought I would share some of my favorite ways to add it to your decorations!

02 November, 2016

Eight Ways to Decorate with Sheet Music at Christmas

CONFESSIONS OF A PLATE ADDICT  Eight Ways to Use Sheet Music at ChristmasIf you are like me and you make a lot of your Christmas decorations, the beginning of November always signals that it’s time to get those projects going! Sooo…I thought I would share a few of my favorites with you…and they are all made with some form of sheet music! It just says Christmas to me…so simple, yet beautiful! Here are eight fun and easy ways you can add sheet music to your Christmas decorations!

23 November, 2014

French Sheet Music Christmas Candles

CONFESSIONS OF A PLATE ADDICT French Sheet Music Christmas Candles I really had fun working on my latest project…my French sheet music Christmas candles! I love the vintage look and the warm little glow that they are adding to my Christmas decorations this year! And…they were easy and inexpensive to create. In fact, I didn’t spend a penny to make them!

23 June, 2013

Summery Sheet Music Sailboats

CONFESSIONS OF A PLATE ADDICT Sheet Music SailboatsSummer has been keeping me busy…lots of yard work and fun extra time with the grands…but I just had to show you my latest project…little summery sailboats made from sheet music!

CONFESSIONS OF A PLATE ADDICT Sailboat Pillow I seem to have a thing about sailboats lately! They star in my new summer sailboat pillow…a combination of burlap and canvas sporting a wonderful sailboat stamp. You can see more of it, including a tutorial and free graphics, by clicking here.

Joseph Conrad And I have pulled out my vintage Joseph Conrad novels…part of a series of his complete works dating from 1925 that my friend Linda at Nina’s Nest and I found at Goodwill a while back. He is still one of my favorite authors, dating from my teenage years when a crush on Peter O’Toole made me read Lord Jim in preparation for the movie! lol And, to my surprise, I discovered my love for books about the sea! A more fitting prop for my little sailboats cannot be found!

CONFESSIONS OF A PLATE ADDICT Sheet Music Sailboats The boats themselves were very easy to make.
  • I pulled out some interesting-looking vintage sheet music from my stash…also a Goodwill find several years ago. I followed the directions that I found here for making origami sailboats. Fortunately, sheet music is the perfect size! If you prefer video instructions, you will find them here.
  • Then I cut a bamboo skewer in half and pushed it through the sail portion of the boat, taping it to the inside.
  • Next, I added a length of string, hot-gluing the center of it to the top of my little mast. I looped and tied the string through little holes I had made in either end of the boat using another bamboo skewer.
  • Finally, I embellished the string with little pennants made from toile scrapbooking paper.

CONFESSIONS OF A PLATE ADDICT Sheet Music Sailboats And…voilà!…here it is! I am taking it for a little ride on a stormy sea to test it out!

CONFESSIONS OF A PLATE ADDICT Sheet Music SailboatsThis one has something special. Do you see what it is? Yes…one of the pennants sports a black cat!

CONFESSIONS OF A PLATE ADDICT Sheet Music Sailboats And here’s a final look! I love them...and they were free since I already had everything I needed! I am going to have fun moving them around the house to add a little summery touch! And…now that I can make origami boats, I will test them out in the wading pool with my little grands!

And in case you are wondering…where is the staff…I have to confess that they have a new addiction…Cat TV! Miss Isabella runs to the window each morning when the blinds are raised to begin her vigil! In fact, she has become such a couch potato that we are beginning a diet plan. I’ll keep you posted on how that is going!


Thanks for stopping by! I hope you enjoyed having a little peek at my sheet music sailboats! Please visit these wonderful bloggers and their beautiful blogs to see what they are up to and to find a list of this week’s participants!
Under the Table and Dreaming for the Sunday Showcase Party , Thrifty Decor Chick for Before and After Monday  , Between Naps on the Porch for Metamorphosis Monday , The Stories of A2Z for Tutorials and Tips Tuesday , Coastal Charm for Nifty Thrifty Tuesday , A Stroll thru Life for Inspire Me Tuesday , Cedar Hill Ranch for The Scoop on Tuesdays , My Uncommon Slice of Suburbia for Tuesday's Treasures, The Everyday Home for Home{work} Wednesday , Savvy Southern Style for Wow Us Wednesdays , The Shabby Creek Cottage for Transformation Thursdays , No Minimalist Here for the Open House Party on Thursdays , Stone Gable for Tutorials, Tips and Tidbits on Thursdays , My Romantic Home for Show and Tell Friday , French Country Cottage for Feathered Nest Friday , Common Ground for Be Inspired on Fridays , The Charm of Home for Home Sweet Home Friday , Craftberry Bush for the Inspiration Gallery on Friday , Funky Junk Interiors for Saturday Nite Special, The DIY Showoff for the Fun in the Sun party
See you next time! À la prochaine!
Also find me at…
Facebook Pinterest Twitter Hometalk Subscribe Email

Enter your email to have Plate Addict's blog posts delivered


Delivered by FeedBurner

Follow on Bloglovin

20 December, 2012

Last Minute Christmas...Easy Vintage Paper Trees

CONFESSIONS OF A PLATE ADDICT Easy Vintage Paper TreesNeed some last minute ideas for Christmas? I have been playing with these…tiny trees made from vintage-y scrapbooking paper! Imagine them as ornaments filling a tree, serving as table decorations or place card holders or even added to Christmas presents! Fun! Today I will show you how to create two different styles of tiny Christmas trees…

CONFESSIONS OF A PLATE ADDICT Shabby Christmas Centerpiece …in addition to the folded vintage paper trees that starred in my shabby Christmas centerpiece that I showed you earlier! If you would like to see a complete tutorial for making these, click here.

CONFESSIONS OF A PLATE ADDICT Easy Vintage Paper Trees The first is a tree made of stacked layers of folded paper. I used a French script scrapbooking paper that I found at Archivers. Honestly, it was a little thick and difficult to work with for the smaller layers. I think next time I might use sheet music or print-outs of vintage script. I found a video for all of you visual learners like me that explains how to do it with almost no words! Click here to see it! (And for those of you who are metric system challenged like me, the circles are roughly 6, 5, 4, 3 and 2 inches in diameter. I did it the old-fashioned way and used a compass to draw my circles.)  I made one change…I used a bamboo skewer rather than a pencil to stack them, then cut it even with the bottom of the trees. Be sure to make the cut for the pencil (or skewer) very small. You can always make it a little larger if need be.

CONFESSIONS OF A PLATE ADDCIT Easy Vintage Paper Trees5 Here’s a third tiny vintage tree that is also super easy! For this one, I used some vintage-look sheet music scrapbooking paper also from Archivers. I especially like this paper since it has two sides! Or you could create your own by using rubber cement (it doesn't wrinkle) and gluing two pieces back to back.


Paper Tree Tutorial They are super easy! Here’s what you do…
  1. Cut three identical pieces using a tree pattern. I found mine here.
  2. Using the side of the paper that will show, fold one of the pieces in half toward the front and one in half toward the back, leaving the last one flat.
  3. Stack them up like this…the one folded back on the bottom, next the one that is flat and finally the one that is folded toward the front on top. Staple them in the middle several times along the fold. Adjust the folds and…
  4. Taa daa! That’s it!

CONFESSIONS OF A PLATE ADDCIT Easy Vintage Paper Trees Aren’t they cute and fun? I printed the pattern in several sizes to create three different sized trees. Just add a little ribbon loop to make ornaments or add a little star to the top with names inscribed and voilà…instant place card holder!

kitty Miss Kitty thinks they would make a fun addition to Christmas packages, too! Wow! She looks like a giant in a tiny vintage forest, doesn't she?

CONFESSIONS OF A PLATE ADDCIT Easy Vintage Paper Trees4Here’s another look at them. Aren’t they cute and festive? And they were so inexpensive...just a few dollars for the scrapbooking paper! I’ll be looking for even more kinds of paper to use and more ways to use them! And…they are so super easy that the children can help make them, too! We are down the last few days and I am getting really exited! I can’t wait to see the grandchildren’s faces on Christmas morning…that’s my favorite part!

Thanks for stopping by! I hope you enjoyed a little peek at my Christmas trees! Please visit these wonderful bloggers and their beautiful blogs to see what they are up to and to find a list of this week’s participants!
Under the Table and Dreaming for the Sunday Showcase Party
Thrifty Decor Chick for Before and After Monday

Boogieboard Cottage for Masterpiece Monday
Between Naps on the Porch for Metamorphosis Monday

The Stories of A2Z for Tutorials and Tips Tuesday
Coastal Charm for Nifty Thrifty Tuesday

A Stroll thru Life for Tabletop Tuesday
Cedar Hill Ranch for Cowgirl Up! on Tuesdays

My Uncommon Slice of Suburbia for Tuesday's Treasures

Savvy Southern Style for Wow Us Wednesdays
DIY by Design for Fall into Fall

The Shabby Creek Cottage for Transformation Thursdays
No Minimalist Here for the Open House Party on Thursdays

Stone Gable for Tutorials, Tips and Tidbits on Thursdays

My Romantic Home for Show and Tell Friday
French Country Cottage for Feathered Nest Friday

At the Picket Fence for Inspiration Friday
Common Ground for Vintage Inspiration Friday
The Charm of Home for Home Sweet Home Friday

Craftberry Bush for Happy Hour on Friday
Funky Junk Interiors for Saturday Nite Special

See you next time! A la prochaine!

Subscribe by email or in a reader
Also find Confessions of a Plate Addict on:

17 December, 2012

Shabby Christmas Centerpiece with Vintage Paper Tree Tutorial

CONFESSIONS OF A PLATE ADDICT Shabby Christmas CenterpieceHere’s a super easy project for you…one that I have had in the back of my mind for a while! It’s my Christmas centerpiece made from lots of fresh greenery from the yard with a few silvery berries for sparkle. It fills a fabulously frenchy galvanized container…a wonderful gift from a sweet friend…with a trio of shabby folded trees to finish it off!

Isabella Miss Isabella says that this is so simple that it’s not too late to give it a try!

Supplies Here’s all you need…some scrapbooking paper cut into an elongated triangle, a wooden skewer and, if you wish, a glittery star to top it off. Mine came from the Pottery Barn outlet…German glitter star vase filler…but you could just as easily make your own.

Folded Tree Tutorial And here is how you do it:
  1. Fold the triangle using an accordion pleat starting at the base.
  2. Punch holes in the folds plus an extra hole near the top.
  3. Thread the skewer through the triangle.
  4. Add a bit of hot glue at the bottom to secure the last fold and then at the top to secure the star. This is how it looks from the back.

CONFESSIONS OF A PLATE ADDICT Shabby Christmas Centerpiece3 And taaa daaa…there it is! I used floral foam in the bottom of the container to hold the greenery and the trees in place. I found the scrapbooking paper at Archivers. This one has a French script motif. Yes…I looked…there really are French words in that scribble! lol

CONFESSIONS OF A PLATE ADDICT Shabby Christmas Centerpiece2 I love this one! This paper has a vintage sheet music motif…

CONFESSIONS OF A PLATE ADDICT Shabby Christmas Centerpiece1 …and even has a different pattern on the back! You will see more of it in my next project!

CONFESSIONS OF A PLATE ADDICT Shabby Christmas Centerpiece And there you have it! It doesn’t take long at all to assemble this one…just some cuttings of whatever you have in your yard and a few simple folded Christmas trees! I love this shabby look…fits right in with my rustic Christmas there this year! Now I have just a few more things to show you before Christmas gets here. It will be here before you know it! Are you ready?

Thanks for stopping by! I hope you enjoyed a little peek at my Christmas centerpiece! Please visit these wonderful bloggers and their beautiful blogs to see what they are up to and to find a list of this week’s participants!
Under the Table and Dreaming for the Sunday Showcase Party
Thrifty Decor Chick for Before and After Monday

Boogieboard Cottage for Masterpiece Monday
Between Naps on the Porch for Metamorphosis Monday

The Stories of A2Z for Tutorials and Tips Tuesday
Coastal Charm for Nifty Thrifty Tuesday

A Stroll thru Life for Tabletop Tuesday
Cedar Hill Ranch for Cowgirl Up! on Tuesdays

My Uncommon Slice of Suburbia for Tuesday's Treasures and the Winter Party 

Savvy Southern Style for Wow Us Wednesdays
DIY by Design for Fall into Fall

The Shabby Creek Cottage for Transformation Thursdays
No Minimalist Here for the Open House Party on Thursdays

Stone Gable for Tutorials, Tips and Tidbits on Thursdays

My Romantic Home for Show and Tell Friday
French Country Cottage for Feathered Nest Friday

At the Picket Fence for Inspiration Friday
Common Ground for Vintage Inspiration Friday
The Charm of Home for Home Sweet Home Friday

Craftberry Bush for Happy Hour on Friday
Funky Junk Interiors for Saturday Nite Special

See you next time! A la prochaine!


Subscribe by email or in a reader
Also find Confessions of a Plate Addict on:


17 November, 2012

Fun Christmas Projects...Sheet Music Decorations

IMG_4378 Wow! Christmas will be here before you know it and it’s time to get crafty! I am seeing a lot of interest on Pinterest and on my blog in my tutorial on creating sheet music decorations for Christmas.  Sooo...just in case you want to make your own, I thought I would show it to you again…with a few more details added. It’s super easy and very inexpensive to do!

page1First, I tried my hand at sheet music candles. I took some vintage sheet music, found at Goodwill for about $1.00 for a whole book, and some cream pillar candles from Michaels…bought with a coupon, of course, and went to work! I simply cut the music to fit, brushed Mod Podge on both sides and attached it! I like the glossy-finished variety. Then I finished with two more coats of it and…
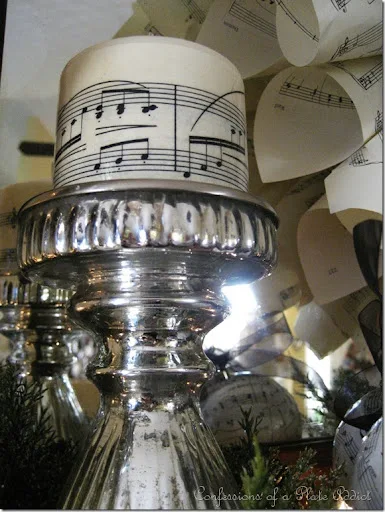
IMG_4373 …here is the result! What do you think? The candles should tunnel burn…down the  middle…but I think I will wait until closer to Christmas to try that! For now, they will just look pretty! And they were so inexpensive to make, coming in at about $2.00 each! Woo hoo!

page Then I was looking at all of the little sheet music scraps when an idea was born…sheet music ornaments! I had bought a plastic sleeve of 4 ornaments for $1.00 at Target and decided to try covering those since the little hanger was already built in. I cut the music into small pieces, notching it in about half way in 3 or 4 places so that it would fit the curve of the sphere a little better. Once again, I applied Mod Podge…my new BFF!…on both sides and two final coats of it at the end. I added a bow on top and…

ornament  …voilà! And since I already had the supplies I needed, these were just 25 cents each for the ornaments! Love it!

IMG_4192 And finally, you know I had to try making a sheet music wreath! I have seen so many pretty ones! I will say that it was a lot of tedious work, but fortunately, I was aided by my lovely assistant, Miss Isabella!
First, I made the cones…50 to 60 made from 1/2 sheet of music, 20 or so made from 1/4 sheet of music and 10 or so made from 1/8 sheet of music. A whole sheet of music makes a big wreath so I cut mine. The wreath will be about 18 inches across when finished. You may have to adjust your cones according to the size you want. I just rolled them and secured them with matte finished tape.
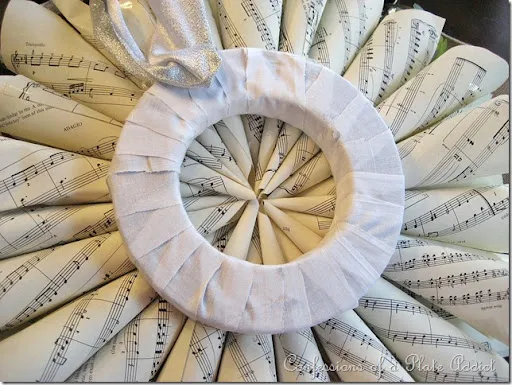
wreath backIt’s simple to put together! Start with a foam wreath form. I found mine at Dollar Tree and cut the foam in half because it was too thick. Then I wrapped it with a strip of white fabric from my stash so that it wouldn’t show. Next, start hot-gluing the cones starting with four…one at each side…north, south east and west…then fill in in between. This is how it looks from the back of the wreath.

CONFESSIONS OF A PLATE ADDICT Sheet Music DecorationsContinue adding the cones going from the largest to the smallest. I opted for a wreath with no hole in the center…almost a kind of sheet music flower instead.

wreath
I hung it on the mirror over the fireplace using a wide ribbon attached to the back. I like the way the mirror makes it look even fuller than it really is! And it only cost $1.00 for the wreath  form!

IMG_4392 And there you have it…fun with sheet music! These really could be used any time of year but I am planning to incorporate them into my Christmas decor. I’ll be showing you some of that soon!

Thanks for stopping by! I hope you enjoyed a little peek at my sheet music decorations! Please visit these wonderful bloggers and their beautiful blogs to see what they are up to and to find a list of this week’s participants!
Under the Table and Dreaming for the Sunday Showcase Party
Thrifty Decor Chick for Before and After Monday

Boogieboard Cottage for Masterpiece Monday
Between Naps on the Porch for Metamorphosis Monday

The Stories of A2Z for Tutorials and Tips Tuesday
Coastal Charm for Nifty Thrifty Tuesday

A Stroll thru Life for Tabletop Tuesday
Cedar Hill Ranch for Cowgirl Up! on Tuesdays

My Uncommon Slice of Suburbia for Tuesday's Treasures
Savvy Southern Style for Wow Us Wednesdays
DIY by Design for Fall into Fall

The Shabby Creek Cottage for Transformation Thursdays
No Minimalist Here for the Open House Party on Thursdays

Stone Gable for Tutorials. Tips and Tidbits on Thursdays
Centsational Girl for the Holiday Home Craft Party
My Romantic Home for Show and Tell Friday
French Country Cottage for Feathered Nest Friday

2805 for Potpourri Friday
At the Picket Fence for Inspiration Friday
Common Ground for Vintage Inspiration Friday
The Charm of Home for Home Sweet Home Friday

Craftberry Bush for Happy Hour on Saturdays
Serenity Now for Weekend Bloggy Reading
Funky Junk Interiors for Saturday Nite Special
See you next time! A la prochaine!

Want to see more?
Subscribe by email or in a reader
Also find Confessions of a Plate Addict on:

09 December, 2011

Easy Wisteria Inspired Sheet Music Candles

CONFESSIONS OF A PLATE ADDICT Wisteria Inspired Sheet Music CandlesHere is absolutely the easiest Christmas project you will ever try…my Wisteria Knock-off sheet music candles…because I am going to give you just about everything you need to do it! I think it is my favorite project this Christmas…not just because they are easy, but because I think they are pretty, too!

Wisteria candles Here is Wisteria’s version…gotta love them!…so wonderfully simple and beautiful! Theirs is a set of four 5 inch high votive holders on sale right now for $21.60 plus shipping.

CONFESSIONS OF A PLATE ADDICT Wisteria Inspired Sheet Music Candles Mine are made using 7 inch high pillar candle holders from Dollar Tree at a total of $4.00 for all four of them…so they cost $1.00 each since I already had everything else! Woo hoo! In addition to the candle holders and four pillar candles, you will need twine, a sheet of red construction paper, printer paper with access to a color printer, tape and glue…that’s it!

CONFESSIONS OF A PLATE ADDICT Wisteria Inspired Sheet Music Candles Just make two copies of each of the following illuminated manuscript pages at 8x10 inch size…I use Photoscape, so this is how they calculate it…and then trim it to fit. Next, wrap the graphic around the candle holder and secure with tape. I used the leftover piece to cover the white space after I taped it. I don’t show it here, but I trimmed off the white edges and glued it over the taped seam. Here are the graphics...

Christmas candles1-horz

graphic

CONFESSIONS OF A PLATE ADDICT Wisteria Inspired Sheet Music Candles Next, I made simple tags to attach to the candles. According to Wisteria’s version, they actually translate a portion of the text. However, I have no clue what mine say…although I am certain it is Biblical…so I just used theirs. Here it is…(Note: the first two lines go together as in the photo above…the rest of the tags use one line.)
    Glory to God in the Highest
And Peace to His People on Earth
Lamb of God Have Mercy on Us
Mary gave birth to her first born, a Son
Through Him you Give us These Gifts

CONFESSIONS OF A PLATE ADDICT Wisteria Inspired Sheet Music CandlesSince the candle can be turned so that a different side shows, it is only necessary to have two different pages to achieve four different candles.

CONFESSIONS OF A PLATE ADDICT Wisteria Inspired Sheet Music Candles I love the way they glow in the candlelight! They really look like old illuminated manuscripts on parchment, don’t they?

CONFESSIONS OF A PLATE ADDICT Wisteria Inspired Sheet Music Candles And here they are on the buffet in the dining room for now. Can you believe how easy they are and how good they look for only $1.00 each? We’ve still got a few weeks until Christmas, so you can make them in a jiffy and have plenty of time to use them! Let me know how it goes if you decide to attempt them! Enjoy!

Thanks for stopping by! I hope you enjoyed a little peek at my Christmas decorations!  Please visit these wonderful bloggers and their beautiful blogs to see what they are up to and to find a list of this week’s participants!
Stephanie Lynn at Under the Table and Dreaming for the Sunday Showcase Party
Kate at Centsational Girl for the Holiday Craft Link Party 
Sarah at Thrifty Decor Chick for Before and After Monday (first Monday of the month)
Mary at Boogieboard Cottage for Masterpiece Monday
Susan at Between Naps on the Porch for Metamorphosis Monday
Marty at A Stroll Thru Life for Tabletop Tuesday
Beth at The Stories of A2Z for Tutorials and Tips Tuesday
Linda at Coastal Charm for Nifty Thrifty Tuesday
Kim at Savvy Southern Style for Wow Us Wednesdays
Judy at DIY by Design for Fall into Fall
Jill at French Cupboard for Voila!French Inspiration on Thursdays
Gina at The Shabby Creek Cottage for Transformation Thursdays
Sherry at No Minimalist Here for the Open House Party on Thursdays
Cindy at My Romantic Home for Show and Tell Friday
Courtney at French Country Cottage for Feathered Nest Friday
Honey at 2805 for Potpourri Friday
Diann at The Thrifty Groove for Thrifty Things Friday
Debra at Common Ground for Fabulous Fall Fun
Sherry at The Charm of Home for Home Sweet Home Friday
Jen at Tatertots & Jello for the Weekend Wrap-up Party
Donna at Funky Junk Interiors for Saturday Nite Special
See you next time! A la prochaine!