

Click to Visit These Popular Posts


Showing posts with label No-Sew Favorites. Show all posts
Showing posts with label No-Sew Favorites. Show all posts
04 May, 2019
Five Favorite No-Sew Projects for Summer


14 June, 2015
Stars and Stripes Burlap Wreath...Just Tie It!
 I am excited because it’s time for our monthly No-Sew Showcase and this time our theme is PATRIOTIC DIY…just in time for Flag Day today and perfect for a head start for the 4th of July! I love adding some red, white and blue, but I still need to have a little vintage or rustic edge…and my stars and stripes burlap wreath does just that!
20 July, 2014
Easy Mason Jar Tea Towels
 I have a super easy summery project for you…my Mason jar tea towels! Mason jars always remind me of my grandmother, who spent a part of each summer canning fresh vegetables from the garden…especially her green beans…my favorites! I grew up in the mountains and green beans there are better than anywhere else on earth…but I digress!
 I love the look of vintage Mason jars…just the perfect shade of blue and the wonderful patina of the old zinc lids! So I was really excited when I stumbled across this…
…a fabulous graphic from…who else?…Karen at The Graphics Fairy! She is always so kind to share her finds with us! I took the liberty of making it a mirror image, since that is what you will need for this project. I simply printed it on iron-on transfer paper at 4x6 size (you can get two on a page) using Photoscape, a free photo editing download, and them cut it out, leaving a small bit around the edges. Next, I followed the directions on the package of transfer paper (I used Avery brand for light fabrics) to add the image to a flour sack kitchen towel (mine came from Target). And that’s it!
 And here’s another look…a perfect copy of the vintage Mason jar…right down to the zinc lid!
 And just in case you are a lover of Mason jars like me, here is my series of seasonal Mason jar candles, beginning with my summer Mason jar candles.
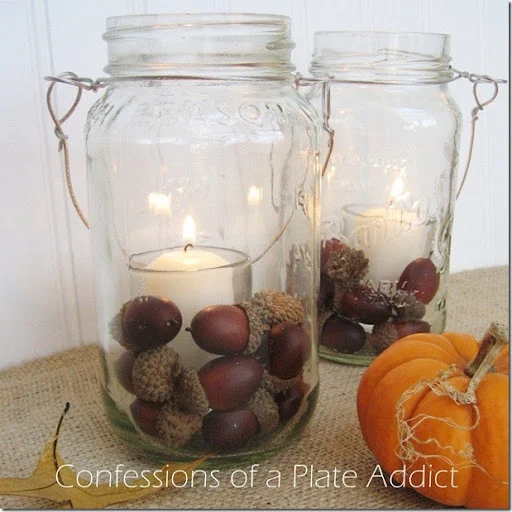 And here are my Pottery Barn inspired Mason jar candles…perfect for fall!
 And to continue my seasonal candle ideas, here are Christmas Mason jar candles…
 …and my Peeps Mason jar candles…my favorite of the bunch!
 Miss Kitty says…Hold on! It’s waaaaay too soon to even discuss those last two! She is in full summer mode, enjoying the playground...and I have to agree! But I figure that you might want to get a head start on some seasonal Mason jar ideas. After all, we early planners have to stick together! :-)
Remember to pin it!

Under the Table and Dreaming for the Sunday Showcase Party , Thrifty Decor Chick for Before and After Monday , Between Naps on the Porch for Metamorphosis Monday , The Stories of A2Z for Tutorials and Tips Tuesday , Coastal Charm for the Show and Share Party , A Stroll thru Life for Inspire Me Tuesday , My Uncommon Slice of Suburbia for Inspire Me Monday, Savvy Southern Style for Wow Us Wednesdays , French Country Cottage for Feathered Nest Friday , Common Ground for Be Inspired on Fridays , The Charm of Home for Home Sweet Home Friday , Craftberry Bush for the Inspiration Gallery on Friday
See you next time! À la prochaine!
Also find me at…


01 June, 2014
Summery No-Sew Linen and Burlap Starfish Pillow
 Summer has definitely arrived here in Georgia with its heat and humidity! So I am taking a break from yard work to share my latest project with you…my no-sew linen and burlap starfish pillow! It’s perfect for summer and it was super easy to make, too!
 Here’s what you will need:
- Starfish template found here …print it and cut it out. (The pattern you see in my photos is no longer available so I have substituted a similar one.)
- Pre-made pillow cover (Mine came from the Pottery Barn Outlet…on sale for $9.00 since the button need to be sewn back on. Woo hoo! However, they also have them at Hobby Lobby.)
- Burlap (1/4 yard should be plenty)
- Heat n Bond Ultra Hold or a similar product
- Iron
- Pillow form (Mine is down and came from Goodwill for $3.00)
1. Cut an 8 1/2 inch square from burlap for each starfish that you plan to make. I made five.

2. Cut an equal number of squares from the Heat n Bond and apply them to the squares of burlap, following the directions on the package.
3. Pin the template to each square and cut out the burlap.

4. Place the cutouts on the pillow cover in a pattern that pleases you. Notice that I cut one of them in half and let it appear in two spots. I later trimmed the arms of the starfish in the bottom right corner as well. Pin them in place.
5. Following package directions, remove the paper backing and iron the starfish in place one by one.
6. Let them cool and then add the pillow insert.
 And….taaa daaa!…here it is! I love the little summery touch that it adds to my décor without being too much!
 And just in case you need another idea for an easy way to add a little summer, here are my summer Mason jar candles!
 And maybe one of my favorite summer projects…my easy and inexpensive sheet music sailboats!
 As for the staff, they are really enjoying summer since cat TV has added a new channel…the Chipmunk Channel!
Thanks for stopping by! I hope you enjoyed seeing my no-sew starfish pillow! Please visit these wonderful bloggers and their beautiful blogs to see what they are up to and to find a list of this week’s participants.
Under the Table and Dreaming for the Sunday Showcase Party , Thrifty Decor Chick for Before and After Monday , Between Naps on the Porch for Metamorphosis Monday , The Stories of A2Z for Tutorials and Tips Tuesday , Coastal Charm for Nifty Thrifty Tuesday , A Stroll thru Life for Inspire Me Tuesday , My Uncommon Slice of Suburbia for Inspire Me Tuesday, Savvy Southern Style for Wow Us Wednesdays , The Shabby Creek Cottage for Transformation Thursdays , No Minimalist Here for the Open House Party on Thursdays , French Country Cottage for Feathered Nest Friday , Common Ground for Be Inspired on Fridays , The Charm of Home for Home Sweet Home Friday , Craftberry Bush for the Inspiration Gallery on Friday
See you next time! À la prochaine!
Also find me at…
11 May, 2014
Easy No-Sew Burlap Rose Wreath
 I am excited to join the no-sew gang for our No-Sew Showcase for May. And…since it is May and flowers are in order, I thought I would show you how to make a wreath with no-sew burlap roses!
 My assistant, Miss Isabella, loves burlap! It’s practical, cheap and adds lots of texture…and it’s just plain fun! That makes this wreath an easy and inexpensive way to welcome your spring and summer guests into your home!
Here’s what you will need:
- Straw wreath form
- Strips of natural burlap to cover the wreath (1/2 yard should be more than enough)
- Strips of brightly colored burlap to create the roses (I used pink, orange and yellow…1/4 yard of each)
- Two squares of green felt for the leaves
- Stapler
- Hot glue gun
- Jute twine to hang the wreath
 And here’s what you will do:
- First, cover the wreath form with strips of burlap, always starting and ending each strip at the back for a more finished look, wrapping at an angle and stapling them in place as you go. Next, create the burlap roses following the instructions that you will find here. Then cut the leaves from felt. I drew them freehand and adjusted the size to fit the size of my roses.
- Now you are ready to attach the roses. I placed them without gluing them until I had an arrangement that I liked. Then I secured them in place with hot glue. Be careful! I like to use a bamboo skewer to press down so I don’t get burned.
- Next you will create the leaves. First, fold down one end about 1/4 of the way and hot glue in place. Next, you will fold in from the two sides and secure with hot glue.
- Your finished leaf should look something like this when you are through. This is to give a little dimension to your leaves.
 Now simply tuck your finished leaves around the wreath then hot glue them in place and…taaa daaa!…a pretty wreath that you can use not only in the spring but all summer as well!
 Mine will be hanging on my back door to greet all of my favorite “back door” friends and my family! I love how colorful and happy it is!
 And just in case you need a few more no-sew ideas, here are my no-sew basket liners…perfect for storage or for serving flatware for your guests.
 Or how about my French farmhouse numbered napkins to add a little frenchiness to your table or to serve as a fun and easy handmade gift.
 Be sure to visit the rest of the no-sew gang to see what they have created! Stop by and say a special “hello” to our guest blogger this month…Jessica at Mom 4 Real. We are so excited that she could join us!
Amy at Atta Girl Says…No-Sew Flower Flip-Flops
Ann at On Sutton Place…No-Sew Tea Towel Pillow Cover
Jessica at Mom 4 Real…DIY No-Sew Valance
Yvonne at StoneGable…No-Sew Flower Tote DIY
Debbie at Confessions of a Plate Addict…No-Sew Burlap Rose Wreath
Thanks for stopping by! I hope you enjoyed seeing my burlap rose wreath! Please visit these wonderful bloggers and their beautiful blogs to see what they are up to and to find a list of this week’s participants.
Under the Table and Dreaming for the Sunday Showcase Party , Thrifty Decor Chick for Before and After Monday , Between Naps on the Porch for Metamorphosis Monday , The Stories of A2Z for Tutorials and Tips Tuesday , Coastal Charm for Nifty Thrifty Tuesday , A Stroll thru Life for Inspire Me Tuesday , My Uncommon Slice of Suburbia for Inspire Me Tuesday, Savvy Southern Style for Wow Us Wednesdays , The Shabby Creek Cottage for Transformation Thursdays , No Minimalist Here for the Open House Party on Thursdays , French Country Cottage for Feathered Nest Friday , Common Ground for Be Inspired on Fridays , The Charm of Home for Home Sweet Home Friday , Craftberry Bush for the Inspiration Gallery on Friday
See you next time! À la prochaine!
Also find me at…
Subscribe to:
Posts (Atom)