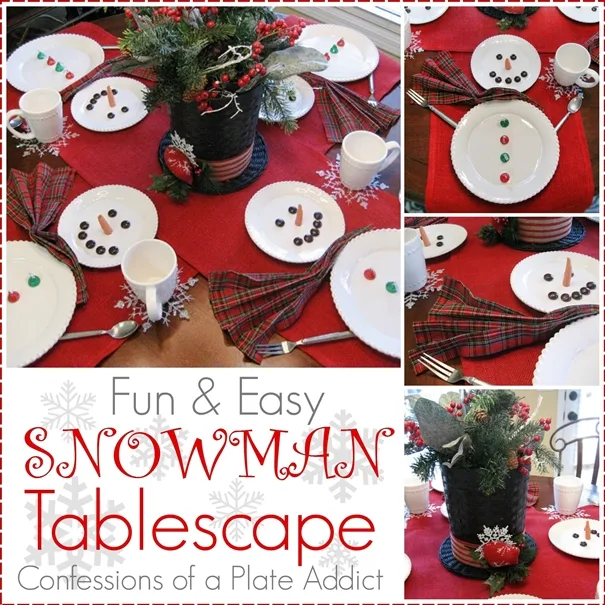
♪ ♫ Do you want to build a snowman? ♫ ♪ Here, with the little grands in the house, we seem to find ourselves still ho-ho-ho-ing, so I have one last Christmas-y idea to share with you. However, with just a few color adjustments...more silver and blue, for example...you could actually take this one right on through the winter months or even into a Frozen party...my snowman tablescape!
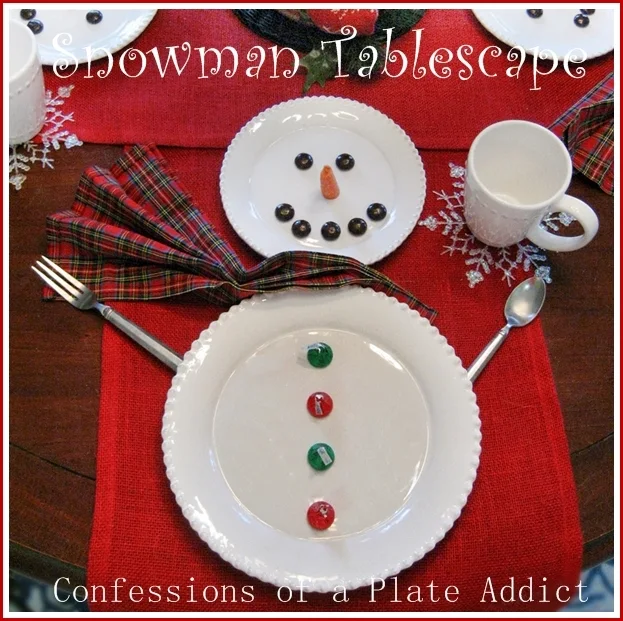
It's simple, really...the same things that always go on a table, just arranged a little differently to suggest a snowman! First, I crisscrossed burlap tablerunners on the table. (I'll show you how I made them later.) A salad plate sits at the top of each dinner plate.
The fork and spoon serve as snowman arms. That's my Octette pewter flatware from Gorham... perfect for branches! Junior Mints and holiday-wrapped Hershey's Kisses are the eyes, mouth and buttons. A real carrot cut to fit serves as his nose. A snowflake ornament sits under each mug as a coaster.
I folded my tartan plaid napkins in an accordion pleat and tucked them under the edge of the plate as wind-blown scarves.
I found this fun stove-pipe hat at Hobby Lobby and added a fun burlap ribbon hatband and a holiday pick as trim. Next, I filled it with some snowy evergreens and berries.
And here he is...my funny Frosty place setting! The little grands loved it! This will become a holiday tradition at my house for sure!
And just in case you want to know how to make the burlap "scarves" for the table, here's what you will do:
- Start with enough burlap to cover your table with an overhang of about 12 inches on each end. Cut the burlap in half lengthwise, press in 1/2 inch and then fold over and press again. Top-stitch the fold, leaving about 7 inches open at each end. (Alternate no-sew method...finish the seam with iron-on seam tape.)
- Pull the cross fibers from each end until you reach the point where your top-stitching stops.
- Gather up about 6 of the strands at a time and tie a knot, adjusting the placement as you tie so that they will line up. Important...be sure to gather up the strands that are next to one another for an even look.
- Repeat for the opposite end. Although this is not hard, it can be tedious, so put on one of your favorite movies or TV shows and tie away! :-)

And just in case you are looking for another idea with a snowman theme, here's my DIY Sharpie Mug...an easy way to add a little fun to an ordinary mug...and they make great gifts, too!
All this talk of snow has Baby Kitty checking out the window...but no sign of it here! It's been 75 degrees every day for about a week now...nice, but I'm one of those strange people who love the cold...so bring it on!
Remember to pin it!
Thanks for stopping by! Please visit these wonderful bloggers and their beautiful blogs to see what they are up to and to find a list of this week’s participants.
Under the Table and Dreaming for the Sunday Showcase Party , Thrifty Decor Chick for Before and After Monday , Between Naps on the Porch for Metamorphosis Monday , The Stories of A2Z for Tutorials and Tips Tuesday , Coastal Charm for the Show and Share Party , A Stroll thru Life for Inspire Me Tuesday , My Uncommon Slice of Suburbia for Inspire Me Monday, Savvy Southern Style for Wow Us Wednesdays , Common Ground for Share Your Style on Thursdays , French Country Cottage for Feathered Nest Friday , The Charm of Home for Home Sweet Home Friday , Craftberry Bush for the Inspiration Gallery on Friday, Tatertots & Jello for the Link Party Palooza on Fridays
See you next time! À la prochaine!
Also find me at…


Adorable. Love to see this perky tablescape while in the duldrums of after-Christmas blandness.
ReplyDeleteSo Cute...love it
ReplyDeleteADORABLE!!!! I have a snowman themed table in my head right now too. I am anxious for when my granddaughter will be old enough to enjoy these things. I sure dID Pin this, so cute!!!! Happy new year to you and your family!!!!
ReplyDeleteThis is so cute! I love snowmen.
ReplyDeleteSweet! EnJOY the snow :-)
ReplyDeleteHAPPY NEW YEAR!
Linda at Beautiful Ideas
ReplyDeleteWhat a wonderful idea!! I have a snowman collection in my hutch every Christmas and this table would coordinate perfectly. I will DEFINITELY be doing this next year. Thank you for coming up with such a creative and delightful winter tablescape! Rosie @ The Magic Hutch
Well, this is just darling!
ReplyDeletexox
What a fun and creative idea for a winter tablescape! Love that pretty red burlap table runner :) Happy New Year! Hugs, Poppy
ReplyDeleteDebbie...this is so adorable, creative and fun!.....I just did a snowman table for my granddaughter and her besties....for a post Christmas, pre New Year's luncheon...will keep this in mind for next year!...Happy New Year!!!
ReplyDeleteHow precious, Debbie! I'm also one of the strange ones....lived in New England 50 yrs before moving to Fl. I miss the snow!
ReplyDeleteI really love this tablescape, it is adorable. Know kids would be crazy about this, as well as
ReplyDeleteadults. Very clever idea, and love the top hat with the Christmas arrangement. I would give this
a 10........on a scale from 1-10..........truly.
Blessings for a Happy New Year.
Nellie
How darling Debbie! I just adore this.
ReplyDeleteDebbie, This is just too cute! My daughter along with SIL and grands are hosting our family Christmas this weekend. Everyone is back from the inlaw's. I am sending this to her for inspiration. Think she will love it too. Happy New Year!. Linda @busheandapickle.com
ReplyDeleteYour snowman tablescape is gorgeous and fun! I love snowmen and almost every year I send various Christmas cards with snowmen on them. You can use this through March!
ReplyDeleteVery cute! I'm glad you spotlighted this at The Scoop this week. My girls would have a blast at the table with this arrangement. Pinned!
ReplyDeleteWow! That is so amazing. You girl, are creativity personified!
ReplyDelete