

Click to Visit These Popular Posts


Showing posts with label Valentine Gifts. Show all posts
Showing posts with label Valentine Gifts. Show all posts
31 January, 2018
10+ Easy Ideas for Valentine Gifts


04 February, 2015
Vintage French Sheet Music Candles
 I’m excited to share my latest project…vintage French sheet music candles! I have even added a few Valentine-y touches for the upcoming holiday, but with a few tweaks, they could actually be used at any time of year!
27 January, 2015
Pottery Barn Inspired No-Sew Valentine Countdown Calendar

09 February, 2014
No-Sew Faux Cross Stitch Valentine Tea Towel

 Well, I am going to let the cat out of the bag…I cannot sew a stitch when it comes to handwork…no needlepoint, no cross stitch, no quilting…nothing! Yikes! And what makes it even worse is that I come from a long line of mountain women who quilt! I have always wanted to learn to cross stitch, and maybe one day I will, but in the meantime, I have created a no-sew version!
 I gave you a little peek at my faux cross stitch Valentine tea towel in my vintage ironstone and sweater hearts Valentine centerpiece. If you would like a closer look, you can see it here.
 And here it is! I love it and it was so super-easy and inexpensive! And now I’ll share my secret…it’s really an iron-on transfer!
 Can you believe it? It looks so real, doesn’t it? All you need is…
 - a vintage-look tea towel…I found mine at Ikea for 79 cents, but I have also seen them at Ross, Michael’s and JoAnn
- a sheet of iron-on transfer paper…I use Avery brand for light fabrics
 Then all you have to do is print the cross stitch heart graphic on iron-on transfer paper and, following the directions on the package, apply it to the tea towel and you are done!
 And just in case you would like to see more example of my easy faux cross stitch, here’s my Pottery Barn inspired no-sew Valentine tea towel…
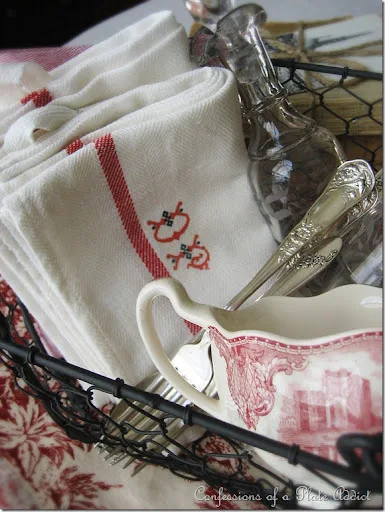 …and my monogrammed vintage French linens…actually more Ikea tea towels with iron-on transfers added!
 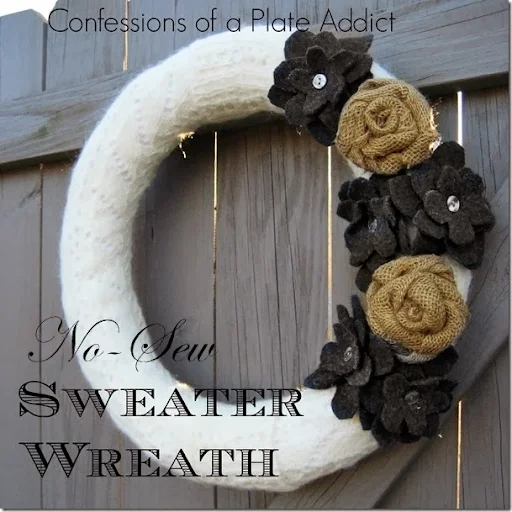 And here's last month’s no-sew project...my no-sew sweater wreath…
 …and my favorite no-sew project so far, my no-sew basket liners! Can you tell I am having a lot of fun with our no-sew group?
Be sure to head on over and visit the rest of the no-sew gang to see what they are up to!

Thanks for stopping by! I hope you enjoyed seeing my faux cross stitch Valentine tea towel! Please visit these wonderful bloggers and their beautiful blogs to see what they are up to and to find a list of this week’s participants!
Under the Table and Dreaming for the Sunday Showcase Party , Between Naps on the Porch for Metamorphosis Monday , The Stories of A2Z for Tutorials and Tips Tuesday , Coastal Charm for Nifty Thrifty Tuesday , A Stroll thru Life for Inspire Me Tuesday , My Uncommon Slice of Suburbia for Tuesday's Treasures, Savvy Southern Style for Wow Us Wednesdays , The Shabby Creek Cottage for Transformation Thursdays , No Minimalist Here for the Open House Party on Thursdays, French Country Cottage for Feathered Nest Friday , Common Ground for Be Inspired on Fridays , The Charm of Home for Home Sweet Home Friday , Craftberry Bush for the Inspiration Gallery on Friday
See you next time! À la prochaine!
Also find me at…


06 February, 2014
DIY Sharpie Plate and the Perfect Little Valentine Gift
 I’ve got a little project for you today that would make a fun and inexpensive Valentine gift…my DIY Sharpie plate and mug!
  Just load the plate up with homemade cookies or fill the mug with Valentine-y goodies and there you have it…the perfect little gift!
 Baby Kitty says he would like some fancy cat food instead…but other than that, he approves!
 You might remember that I recently shared my DIY Sharpie mugs as a part of my cozy home tour…and you will follow much the same process for making my Valentine versions!
Here’s what you will need:
- Plain white mugs and/or plates (Mine were Better Homes brand from Walmart. It seems that the cheaper ones do better.)
- Sharpie fine point oil-based markers (I got mine at Michaels. You will want to use a coupon since they are more expensive than regular Sharpies.) From what I have read, oil-based markers create a longer-lasting result.
- Alcohol swabs ( I used them to erase my mistakes, so I used lots of them!)
- Clean the plate with an alcohol swab.
- Using the oil-based Sharpie marker, add your artwork or text. Good news! If you make a boo boo, you can use an alcohol swab to “erase” it and start over! Just be sure to wring it out first so that it doesn’t drip and ruin your hard work!
- Let them dry for 24 hours.
- Place the mugs in a cold oven and heat to 425 degrees. Once the correct temperature is reached, bake for 30 minutes. Do not touch the hot mugs!
- Allow them to stay in the oven until completely cool! They will now be safe to wash by hand. (I personally would not wash them in the dishwasher.)
 Now your plate or mug is ready to give away…if you can part with it! I decided to add homemade cookies to mine. I especially loved the little over-the-mug heart-shaped cookie cutter that I found at World Market! Wouldn’t a little bundle of these tucked inside this mug make a great little gift?
 And just in case you are looking for a great cookie recipe…I have one for you! And it has been in my family for over 30 years!
Click here for a printable version of the recipe.
FAVORITE HOMEMADE SUGAR COOKIES
from Confessions of a Plate Addict
INGREDIENTS
- 3/4 cup butter flavored Crisco
- 1 cup sugar
- 2 eggs
- 1 teaspoon vanilla extract
- 2 1/2 cups all-purpose flour
- 1 teaspoon baking powder
- 1 teaspoon salt
DIRECTIONS
Cream Crisco and sugar.
Add eggs and vanilla and mix well.
Gradually stir in flour, baking powder and salt.
Cover and chill at least one hour…preferably overnight.
Roll chilled dough 1/8 inch thick on floured wax paper.
Cut with cookie cutters and place on ungreased cookie sheet. (I use parchment paper.) Sprinkle with colored sugar if desired.
Bake at 350 degrees for 6 to 10 minutes. Allow to cool and remove.
Makes 3 dozen cookies.
from Confessions of a Plate Addict
http://confessionsofaplateaddict.blogspot.com
Click here for a printable version of the recipe.
 And here it is…my easy and inexpensive Valentine gift! It’s a perfect pair…a handmade Sharpie plate or mug and homemade sugar cookies!
Thanks for stopping by! I hope you enjoyed seeing my Valentine Sharpie plate! Please visit these wonderful bloggers and their beautiful blogs to see what they are up to and to find a list of this week’s participants!
Under the Table and Dreaming for the Sunday Showcase Party , Between Naps on the Porch for Metamorphosis Monday , The Stories of A2Z for Tutorials and Tips Tuesday , Coastal Charm for Nifty Thrifty Tuesday , A Stroll thru Life for Inspire Me Tuesday , My Uncommon Slice of Suburbia for Tuesday's Treasures, Savvy Southern Style for Wow Us Wednesdays , The Shabby Creek Cottage for Transformation Thursdays , No Minimalist Here for the Open House Party on Thursdays, French Country Cottage for Feathered Nest Friday , Common Ground for Be Inspired on Fridays , The Charm of Home for Home Sweet Home Friday , Craftberry Bush for the Inspiration Gallery on Friday
See you next time! À la prochaine!
Also find me at…
04 February, 2014
Vintage "Bunny Love" Valentine Pillow
 I am excited to join 25 talented bloggers for The Scoop’s Valentine Blog Tour…bringing you loads of inspiration just in time for Valentine’s Day! I am sharing my latest project…my bunny love pillow!
  Baby kitty is especially excited about this one…inspired by a pillow spotted on Joss and Main…pointing out that it could stay out waaay past Valentine’s Day until Easter! Good idea!
I simply added a pair of bunnies and a heart to a page from a vintage French dictionary…Valentine-y without being too cutesy and the just-right vintage look for me!
Here’s what you will need:
- Iron-on transfer paper (I use Avery brand for light fabrics)
- Pillow insert (Mine is down and came from Goodwill for under $3.00)
- Fabric for the cover…the amount will depend on the size of your insert
- Print the graphic on iron-on transfer paper at 8 x 10 size. It has already been reversed for you.
- Cut the fabric to fit your pillow cover front one inch wider and longer than the insert.
- Apply the transfer to the pillow front following instructions on the package.
 To create the back of the pillow cover, I find that it is much faster and easier to use an envelope closure. You will find a complete tutorial, including tips for measuring your fabric, by clicking here. This allows me to remove the cover for easy storage and re-use the pillow insert for my growing collection of throw pillows! :-)
 I decided to take advantage of last week’s rare Georgia snow to show off my bunny pillow outside! It looks just perfect for snuggling with a cozy throw!
- A Farmhouse Valentine Wreath with Sweater Hearts
- Vintage Ironstone Valentine Centerpiece
- Farmhouse Valentine Mantel
- Pottery Barn Inspired Valentine Tea Towel
- Valentine Vignettes and a Vintage French Valentine

I am excited to join The Scoop's Valentine tour!
Under the Table and Dreaming for the Sunday Showcase Party , Between Naps on the Porch for Metamorphosis Monday , The Stories of A2Z for Tutorials and Tips Tuesday , Coastal Charm for Nifty Thrifty Tuesday , A Stroll thru Life for Inspire Me Tuesday , My Uncommon Slice of Suburbia for Tuesday's Treasures, Savvy Southern Style for Wow Us Wednesdays , The Shabby Creek Cottage for Transformation Thursdays , No Minimalist Here for the Open House Party on Thursdays, French Country Cottage for Feathered Nest Friday , Common Ground for Be Inspired on Fridays , The Charm of Home for Home Sweet Home Friday , Craftberry Bush for the Inspiration Gallery on Friday
See you next time! À la prochaine!
Also find me at…
Subscribe to:
Posts (Atom)